BBQ Smoked Sausage Dense Bean Salad | High Protein Meal Prep Recipe

JUMP TO:: MEDICAL + AFFILIATE LINK DISCLOSURES

📝 Jump to Recipe 📝 | 🖨 Print Recipe 🖨


The hubs is out of town this weekend, and I agreed to pick up a shift for a coworker Saturday night. Soooo you know I wanted something I could just snack on all weekend AND take to work if I didn’t get called off for low census.

I’ve been absolutely loving dense bean salads lately. High protein, high fiber, zero effort after the initial toss-together, and they taste even BETTER after they sit in the fridge for a day or two. That was the plan… except I didn’t go to the store to get any ingredients beforehand.

So it became a wing-it-with-what-I-had-in-the-pantry-and-fridge type moment.

But daaaamn did it turn out delicious!!!

No chicken on hand (ok, so I had some… FROZEN lol), but I DID have a leftover smoked sausage we didn’t use in a recipe this week. The first time I made this, I didn’t even have an onion or a bell pepper, and it was STILL delicious. But if I added them in? Next level. I went ahead and put them in the recipe below, because they belong there. No cherry tomatoes… buuut I had a jar of sun-dried tomatoes. SOLD. I even used some of the oil from the jar to make the dressing. No chickpeas… buuut I had kidney beans, and honestly? They kind of go perfectly with the BBQ vibes I had in my head when I pulled out that sausage.

Sometimes the best recipes happen when you don’t have the “right” ingredients.

Close up of BBQ smoked sausage dense bean salad with black beans, dark red kidney beans, corn, crispy sausage slices, sun dried tomatoes, banana peppers, and shredded cheddar
This is what 10 minutes and a fridge full of “I don’t have the right ingredients” gets you.

Why I’m Obsessed with Dense Bean Salads for Meal Prep

These kinds of salads have quickly become a staple in my routine. They’re packed with protein and fiber, which are the only two things I actually pay attention to on my weight loss (and now maintenance) journey. And bonus… they taste freakin amazing!!!

You can eat them straight out of the container, scoop them up with tortilla chips or pita tips, toss them in a wrap, pile them on a bed of lettuce… lots of ways to enjoy the same dense bean salad throughout the week without getting burned out eating the same thing. They’re great for meal prep because they just get better and better as they marinate. By day three? Chef’s kiss.

If you’re someone who needs grab-and-go lunches, works night shift, or just doesn’t want to think about food five separate times a day… this is it.


↑ Back to Top ↑ 🖨 Print Recipe 🖨

Prep time: 10 minutes (while the sausage cooks) | Cook time: 10 minutes | Total time: 10–15 minutes Servings: 6 (approximately 1 generous cup per serving)

Ingredients

Salad

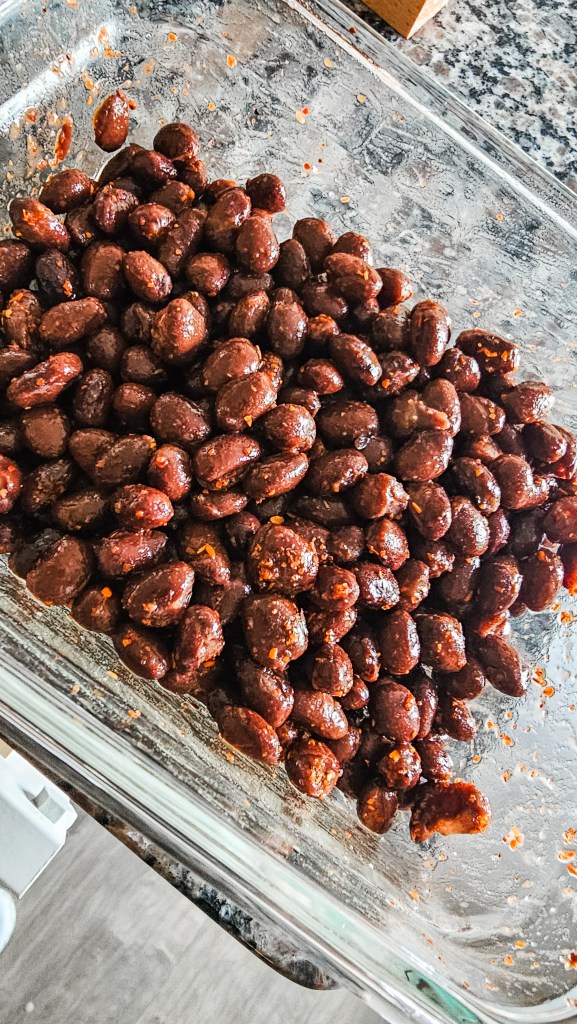
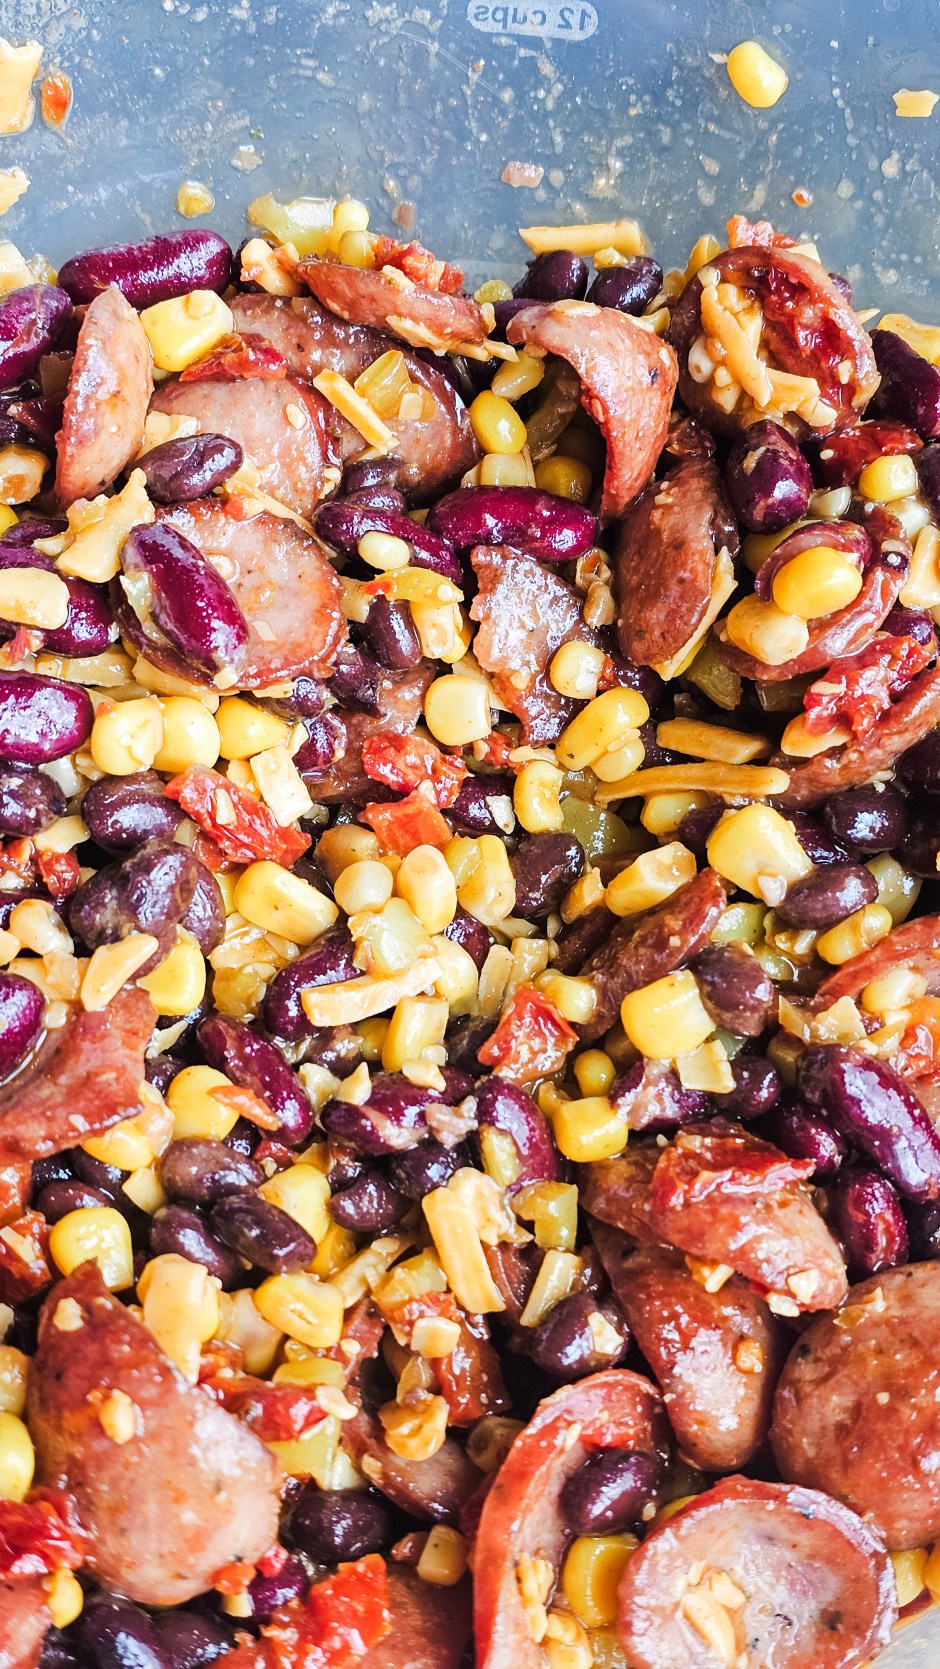
  • 1 can (15 oz) black beans, drained and rinsed
  • 1 can (15 oz) dark red kidney beans, drained and rinsed
  • 1 can (15 oz) corn, drained
  • 1 smoked sausage (about 12–14 oz), thinly sliced
  • 1/2 jar julienned sun-dried tomatoes (in oil and herbs), minced
  • 1 bell pepper, finely diced
  • 1/2 red onion, finely diced
  • 1/4 to 1/2 cup banana pepper rings, minced
  • 1/4 cup shredded cheddar cheese

Dressing

  • Oil from the sun-dried tomato jar (pour out until just above the remaining tomatoes so they don’t dry out)
  • 1/4 cup liquid from the banana pepper jar
  • 1/8 cup (2 tablespoons) extra virgin olive oil
  • 1 to 2 tablespoons sweet BBQ sauce
  • 1 tablespoon balsamic vinegar
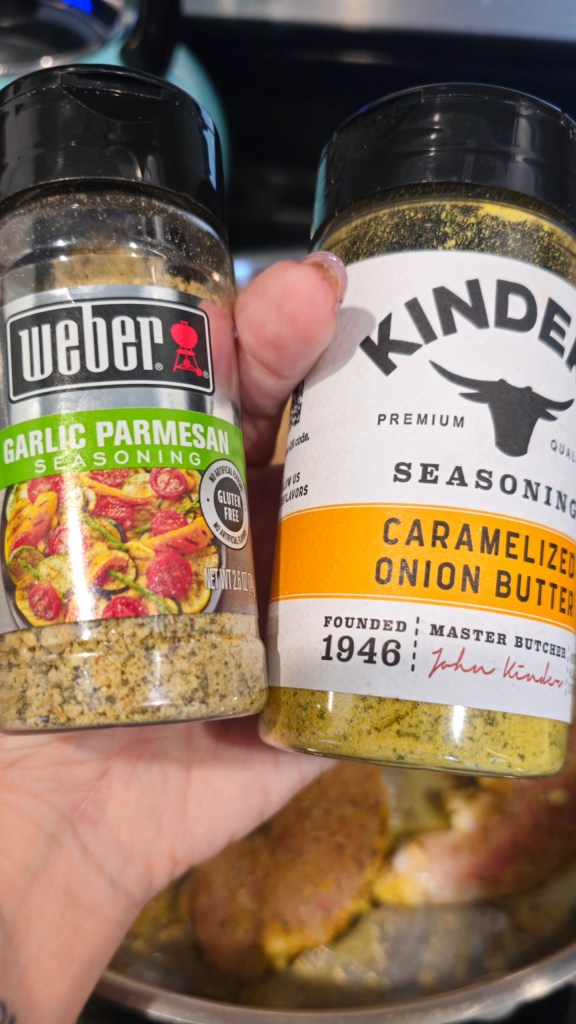
  • 1 teaspoon Kinder’s Garlic Parmesan seasoning
  • 1/4 teaspoon Kinder’s Caramelized Onion Butter seasoning
  • 1 teaspoon paprika

Directions

  1. Cook the sausage. Slice your smoked sausage into thin rounds and cook over medium heat until browned and a little crispy on the edges. Set aside and allow to cool.
  2. Make the dressing. Combine all dressing ingredients and whisk until blended. (I use an electric milk frother and it works perfectly.)
  3. Prep the base. Drain and rinse all canned goods and add to a large bowl.
  4. Toss it all together. Add the cooled sausage, sun-dried tomatoes, banana peppers, and cheddar cheese to the bowl. Pour the dressing over everything and mix well.
  5. Refrigerate. Let it sit in the fridge for at least 30 minutes before eating so the flavors can start to marry. Keeps refrigerated for up to 1 week.

Estimated Nutrition Per Serving (6 servings)

These are estimates based on standard nutritional data. Your numbers may vary slightly depending on the specific brands you use.

  • Calories: ~330-370
  • Protein: ~18-20g
  • Fiber: ~10-12g
  • Carbs: ~35-40g
  • Fat: ~14-18g

The protein and fiber in this recipe are the real stars. Between the two types of beans, the corn, and the smoked sausage, you’re getting a solid macro profile for a no-reheat meal.

Want more protein? I normally make my dense bean salads with shredded rotisserie chicken (white meat), and that bumps the protein up to around 25–28g per serving while cutting the fat way down. The smoked sausage version happened because it’s what I had on hand, and it turned out SO good that it earned its own recipe. But if you’re focused on hitting higher protein numbers, grab a rotisserie chicken on your way home and shred it up. Same recipe, same dressing, just swap the protein.

Tips, Swaps, and Variations

  • Skip the sausage for a vegetarian version. The beans carry enough protein on their own. Add extra cheese or some crumbled feta to keep it satisfying.
  • Swap the beans. Chickpeas, pinto beans, cannellini beans… use whatever you have. The beauty of a dense bean salad is that it’s flexible.
  • Make it spicier. Add some diced jalapeño or a pinch of cayenne to the dressing.
  • Use chicken sausage if you want to cut the fat and keep the protein high.
  • Serving ideas: Eat it straight, scoop with tortilla chips or pita chips, roll it in a tortilla wrap, or pile it on top of a bed of greens.
  • Meal prep note: This recipe is specifically designed to last all week. It gets better as it sits. Make it on Sunday, eat it through Friday.

Why Dense Bean Salads Work for Weight Loss and Maintenance

I started making dense bean salads when I was actively losing weight, and now that I’m in maintenance, I still make them at least once a month. Here’s why they work:

Protein and fiber keep you full. These are the two things that matter most when you’re trying to stay satisfied without overeating. One serving of this salad has roughly 18–20g of protein (25-28g if you swap the sausage out for the rotisserie chicken) and 10–12g of fiber. That’s a real meal, not a snack.

No reheating required. If you work a 12-hour shift (hi, that’s me), you need food you can grab out of the fridge and eat. No microwave line. No waiting. Just open and eat.

They don’t get sad in the fridge. Unlike green salads that wilt by day two, dense bean salads actually improve over time as the dressing soaks into the beans. Day three is peak flavor.

They’re endlessly customizable. Once you get the base formula down (beans + protein + veggies + dressing), you can change the entire flavor profile just by swapping the dressing and a few ingredients. This one is BBQ. Next week could be Mediterranean, Southwest, or Italian.


This post contains affiliate links and/or brand partnership content. I may earn a commission at no extra cost to you.

LET’S BE CLEAR ABOUT WHO I AM (AND WHO I’M NOT).

I’m a registered nurse and health coach who shares real, BS-free information about metabolic health, PCOS, perimenopause, and weight loss, because y’all deserve better than vague wellness fluff. But here’s what I need you to know: I am not YOUR nurse. Everything I share here is for educational purposes only. It is not medical advice, it’s not a diagnosis, and it doesn’t create a provider-patient relationship between us. Nothing on this site replaces the care of a licensed provider who actually knows your full health history. The opinions and content here are my own and do not reflect the views of my employer or the hospital where I work.

SCOPE OF PRACTICE.

As a nurse health coach, I can recommend over-the-counter products and supplements that may support your wellness goals. I don’t prescribe specific prescription medications. When it comes to GLP-1s and peptides, what I can do is talk about the science, what’s available, and what may be beneficial, so you can have an informed conversation with your licensed medical provider. The decision about what’s right for your body always belongs to you and your provider. Always consult your licensed provider before starting any prescription treatment — this is not something that should be DIY’d. These statements have not been evaluated by the FDA. Products discussed on this site are not intended to diagnose, treat, cure, or prevent any disease.

TRANSPARENCY.

I only recommend things I actually trust. Most are products I personally use, some are from partners whose clinical standards I believe in. I will always let you know when it’s something I haven’t tried personally. Some links on this site are affiliate links or part of brand partnerships, which means I may earn a commission at no extra cost to you. As an Amazon Associate, I earn from qualifying purchases.

RESULTS + TESTIMONIALS.

Any testimonials or results shared on this site reflect individual experiences only. Results are not guaranteed and will vary based on individual circumstances.

↑ BACK TO TOP ↑

The Protein-Packed Breakfast Burrito I Make on Repeat

📝 Jump to Recipe 📝 | 🖨 Print Recipe 🖨

So you’ve been standing in your kitchen at 7am thinking,
“I need protein… but I also need this to taste like something… and isn’t another protein shake.” 🌯🔥

Same.

High protein breakfast burrito served with fresh salsa on a decorative plate
My go-to high protein breakfast burrito with sausage, fluffy eggs, cheddar, and salsa

Here’s the breakfast burrito that has been carrying me through NICU shifts, content batching days, and those mornings where my ADHD brain forgets I need to eat until I’m suddenly feral… and this becomes more brunch than breakfast. Honestly, I eat it more often than I like to admit thanks to my ADHD hyperfixation on them.

It’s simple. It’s high protein. It actually tastes good.

🌯 My Go-To High Protein Breakfast Burrito

Bite of a high protein breakfast burrito with sausage and scrambled eggs
Fluffy eggs and sausage packed into this easy high protein breakfast burrito

Why I Love It

  • Balanced protein + fat = steady energy
  • No blood sugar crash an hour later
  • Takes like 10 minutes
  • Actually keeps me full

When I stopped obsessing over calories and started focusing on protein and fiber, breakfast was the first thing I fixed. This burrito makes that easy.

Close-up of high protein breakfast burrito in a spinach tortilla with egg and sausage
Spinach tortilla version of my high protein breakfast burrito

↑ Back to Top ↑ 🖨 Print Recipe 🖨

🛒 Ingredients

  • 1 burrito-size tortilla
    (Spinach ones when I’m feeling mildly superior 🌿)
  • 1 egg
  • 1 tbsp cottage cheese or splash of Fairlife milk
  • Handful of shredded cheddar cheese
  • Tajín seasoning
    Season with your heart. Mine says heavy.
  • 1 frozen sausage patty
    (Or bulk ground breakfast sausage)
  • Small dollop light sour cream
  • 1 cup salsa on the side

Yes, a full cup. I like flavor.

🔥 How I Make It

1️⃣ Air Fry the Sausage

Frozen patty goes straight into the air fryer.
Around 370–380°F for 8–10 minutes depending on thickness.

If I’m using bulk sausage, I brown it first in a skillet.

2️⃣ Fluffy, Cheesy Eggs

While the sausage cooks:

  • Whisk the egg + cottage cheese (or milk).
  • Add Tajín like you’re not afraid of flavor.
  • Scramble low and slow.
  • When they’re almost done, fold in a handful of shredded cheddar so it melts right into the eggs.

Soft. Creamy. Actually satisfying.

3️⃣ Warm the Tortilla

Quick warm so it doesn’t crack when you roll it.

4️⃣ Assemble

Eggs + sausage.
Roll it up.
Add a small dollop of light sour cream.
Serve with salsa.
Dip every bite like you mean it!

💪 Protein Breakdown (Approximate)

  • Egg: ~6g
  • Cottage cheese: ~2g
  • Cheddar: 5–7g depending on how generous you are
  • Sausage: 8–10g
  • Tortilla: 5–8g

You’re easily in the 25–30g protein range.

🌯 Make-Ahead + Freezer Friendly

If you’ve got 30–40 minutes on a Sunday (or honestly any random afternoon you feel productive), you can batch these and coast all week.

🧊 Option 1: Fridge (Up to 4–5 Days)
  • Cook everything fully.
  • Let ingredients cool slightly before assembling.
    (Hot fillings = soggy tortilla. We are not doing that.)
  • Roll tightly.
  • Wrap individually in foil or parchment.
  • Store in an airtight container in the fridge.

To reheat:
Microwave 60–90 seconds, flipping halfway.
If you want the tortilla slightly crisp, toss it in a skillet for a minute after microwaving.

❄️ Option 2: Freezer (Up to 2–3 Months)

These freeze beautifully.

  • Assemble burritos without the salsa.
  • I recommend adding the sour cream fresh after reheating, but you can freeze it inside if you’re not picky.
  • Wrap tightly in foil or plastic wrap.
  • Place in a freezer-safe bag.

To reheat from frozen:

  • Microwave 2–3 minutes, flipping halfway.
  • Or thaw overnight in the fridge and heat like normal.

If you want that slightly crisp exterior, unwrap and toss in a pan or air fryer for a couple minutes after heating.

💪 Why This Works

Protein in the morning =
✔ steadier energy
✔ less snack spiraling
✔ fewer “why am I starving already?” moments

For something that tastes like actual breakfast and not punishment? That’s a win.

High protein.
Balanced.
Flavorful.
Air fryer doing half the work.
It supports your goals without making you miserable.

Breakfast doesn’t need to be complicated. It just needs to carry you through the morning without you spiraling toward the snack drawer at 9:47am.

And this one works. 🌯✨

High protein breakfast is amazing.

High protein breakfast that’s already made when you’re tired, overstimulated, late, or just not in the mood to function?

That’s the real win.

This keeps you from:

  • Skipping breakfast
  • Grabbing random snacks
  • Living off caffeine until noon

And if you’re working early shifts, juggling kids, navigating hormones, or just trying to eat like a grown adult… having these ready is elite behavior.

Make 6–8 at once and thank yourself later.
Future You deserves burritos too. 🌯✨

J. Nicole, RN custom signature XOXO, Niki for NicoleInScrubs.com

My Secret Black Bean Protein Hack: Simple Flavor, Zero Effort

I’m a big believer that healthy eating should never be complicated. If a recipe or prep step takes too long, chances are I won’t stick with it-and I’m guessing you feel the same way!

Over my wellness journey, which has thankfully led to a 94lb total weight loss, I’ve relied heavily on easy protein and fiber sources to keep me full, satisfied, and on track. This one simple food prep trick has become a staple in my kitchen, and I can’t wait to share it with you.

Meal prep protein hack: Black beans seasoned with Tajín chili lime powder in a clear glass storage container for quick addition to healthy recipes.
This two-ingredient black bean protein hack is my secret weapon for fast, healthy meals all week. Simple prep, maximum flavor!

The Two-Ingredient Protein Powerhouse

Forget fancy cooking. All you need for this high-protein, high-fiber hack is:

  1. One can of black beans (or two, or three-stock up!)
  2. A bottle of Tajín Clásico Seasoning

That’s it. This combo turns plain canned beans into a vibrant, zesty side or topping that tastes amazing cold, making it perfect for meal prepping.

The “How-To” in 60 Seconds

The goal here is minimal effort for maximum flavor.

  1. Rinse and Drain::
    • Open your can of black beans
    • Pour them into a strainer
    • Give them a thorough rinse under cold water
      • This removes the starchy canning liquid and makes the final product taste much fresher.
  2. Toss::
    • Put the rinsed beans into a bowl or directly into your meal prep container.
  3. Season::
    • Sprinkle generously with Tajín.
    • I don’t measure, but you want to ensure a light coating of the chili-lime powder covers all the beans.
    • Give the container a good shake (or stir with a spoon).
  4. Chill and Store::
    • Store them in an airtight container in the fridge.
    • They’ll keep well for about 5 days.

The light salt, chili, and lime flavor of the Tajín permeates the beans overnight, making them an instant flavor-booster for any meal.

4 Ways to Add Zesty Protein to Your Week

This hack is designed for versatility. Since the beans are ready to go, you can toss them into almost anything for an extra boost of fiber and protein.

  • Elevated Salads::
    • Ditch plain croutons.
    • A spoonful of Tajín black beans adds texture, protein, and a vibrant kick to any garden or taco salad.
  • Breakfast Burritos::
    • Start your day strong – mix these into your morning scramble with eggs and cheese, then wrap in a tortilla.
  • Quick Tacos/Bowls::
    • They are the perfect ready-made filling for a simple weeknight taco night or a quick lunch bowl with rice and veggies.
  • Simple Side Dish::
    • Need a quick, healthy side? Just scoop a serving onto your plate next to a piece of grilled chicken or fish.

Try this simple hack this week! It’s one of those small changes that makes a big difference in hitting your daily protein and fiber goals without adding any extra cooking time to your routine.

The Best Creamy Sun-Dried Tomato Chicken Pasta (Ready in 20 Mins!)

📝 Jump to Recipe 📝 | 🖨 Print Recipe 🖨

Stop what you’re doing. I think I just found our new favorite fall pasta. 🍝

Okay, besties, can we talk about “fall flavors” for a sec? I love a good pumpkin spice or apple cider moment as much as the next person, but sometimes I crave something cozy and comforting that isn’t that. I’m always on the hunt for those perfect fall dishes that feel like a warm hug in a bowl, and this one? This one immediately got added to the permanent rotation.

It’s creamy, it’s savory, and it has this bright, zesty kick from lemon and sun-dried tomatoes that cuts through the richness in the most perfect way. It’s a dish that is helping me switch up my fall menu, and I know you’re going to be obsessed, too.

The best part? It comes together SO fast, especially if you use my favorite shortcut: a pre-shredded rotisserie chicken from the grocery store. It’s the definition of a low-effort, high-reward meal that tastes like you spent hours on it. This is a quick way to solve the “what’s for dinner?” problem on a busy night.

Trust me, you’re going to want to make this ASAP.

↑ Back to Top ↑ 🖨 Print Recipe 🖨

Creamy Sundried Tomato & Chicken Pasta

This dish is a weeknight dinner that immediately earns a spot in your permanent rotation. It’s bright, creamy, and comes together in the time it takes to boil your pasta

Yields: 4-6 servings
Prep time: 10 minutes
Cook time: 20 minutes

Ingredients

  • 16 oz spaghetti
  • 2 tbsp butter
  • 1-2 cooked chicken breasts, shredded (rotisserie chicken works perfectly!)
  • 1 tbsp Webber’s Garlic & Parmesan Seasoning (or to taste)
  • 1 tbsp Kinder’s Caramelized Onion Seasoning (or to taste)
  • 1 jar (approx. 7 oz) julienne-cut sun-dried tomatoes in oil, drained
  • 1 jar (approx. 3.5 oz) capers, drained
  • 2 large lemons
  • 1 ½ cups heavy cream
  • ½ cup grated parmesan cheese, plus more for garnish
  • Salt for pasta water

Instructions

  • Cook the Pasta: Bring a large pot of well-salted water to a boil.
  • Cook the spaghetti until al dente according to package directions. Before draining, reserve about ½ cup of the starchy pasta water.
  • Sauté the Chicken: While the pasta cooks, melt the butter in a large skillet over medium heat. Add the shredded chicken and season to taste with the garlic & parmesan and caramelized onion seasonings. Cook until the chicken is warmed through and fragrant, about 3-5 minutes.
  • Build the Flavor: Add the drained sun-dried tomatoes and capers to the skillet with the chicken. Stir and cook for another 2 minutes to let the flavors meld together.
  • Make the Sauce: Zest both lemons directly into the skillet. Then, cut them in half and squeeze the juice of both lemons into the pan to deglaze, scraping up any tasty bits from the bottom.
  • Get Creamy: Pour in the heavy cream and bring the mixture to a gentle simmer. Once simmering, reduce the heat to low and stir in the ½ cup of grated Parmesan cheese. Continue stirring until the cheese is melted and the sauce has started to thicken.
  • Combine & Finish: Drain the cooked pasta and add it directly to the skillet with the sauce. Toss everything together until the spaghetti is fully coated. If the sauce is too thick, add a splash (about 1/8 to 1/4 cup) of the reserved pasta water to reach your desired consistency.
  • Serve: Garnish generously with additional grated parmesan cheese and enjoy immediately!

Creamy Caesar Chicken Pasta

📝 Jump to Recipe 📝 | 🖨 Print Recipe 🖨

Here’s a quick way to solve the “what’s for dinner?” panic for good.

Okay, besties, let’s talk about the 5 p.m. fridge stare. You open the fridge. Nothing looks good. You’re tired. The idea of a complicated meal is a big NOPE. We’ve all been there.

What if you could have a restaurant-worthy, creamy, savory pasta on the table in about 20 minutes, using stuff you probably already have?

This Creamy Caesar Chicken Pasta has been my secret weapon for years, and I’m finally sharing the super simple recipe. It’s the definition of a low-effort, high-reward meal that will save you on busy weeknights.

Trust me, this one’s a game-changer. Scroll on down for the full recipe! 👇

Why You’ll Be Obsessed With This Recipe

Before you get to the how-to, let’s talk about why this is about to become your new favorite dish. This is all about making your life easier.

  • The Ultimate Hack: The secret is using Caesar dressing as your sauce base! It’s a full-on cheat code because it already has the garlic, parmesan, and tangy goodness built right in.
  • Use What You’ve Got: This recipe is so forgiving. Don’t have heavy cream? Use sour cream or cream cheese. No broccoli? Toss in some spinach. It’s designed for you to use what’s in your fridge right now.
  • Seriously Fast: From start to finish, you’re looking at about 20 minutes. The sauce comes together in the same pan you used for the chicken, so cleanup is a breeze.

↑ Back to Top ↑ 🖨 Print Recipe 🖨

My 20-Minute Creamy Caesar Chicken Pasta

Yields: 2-3 servings Prep time: 5 minutes Cook time: 15-20 minutes

Ingredients

  • 8 oz pasta of your choice (penne, spaghetti, bowties, and rotini work great!)
  • 1 lb boneless, skinless chicken breast (optional: cut into bite-sized pieces)
  • 1 tbsp butter
  • Webber Garlic Parmesan & Kinders Caramelized Onion Butter (or whatever tasty seasoning you have on hand) to taste
  • Juice of 1 lemon (or lemon juice from the bottle works too!)
  • 1/2 cup Caesar dressing (the creamy kind!)
  • 1/4 cup cream base (heavy cream, sour cream, or cream cheese)
  • 1-2 cups of a green vegetable (broccoli florets or fresh spinach)
  • Grated parmesan cheese for serving

Instructions

  1. Cook the Pasta & Veg: Get a pot of salted water boiling and cook your pasta according to package directions. If you’re using broccoli, toss the florets in for the last 3-4 minutes of cooking to blanch them perfectly.
  2. Sauté the Chicken: While the pasta is cooking, heat the butter in a large skillet over medium-high heat. Season your chicken and cook until golden brown and cooked through, about 5-7 minutes. Optional: (sometimes I do, sometimes I dont lol) Remove the chicken from the skillet and set it aside.
  3. Deglaze the pan with the lemon juice
  4. Make the Pan Sauce: Turn the heat down to low. In the same skillet, whisk together the Caesar dressing and your cream base (heavy cream, sour cream, or cream cheese) until it’s smooth and starts to bubble slightly.
  5. Combine & Serve: Add the cooked chicken back into the skillet (if you took it out haha) with the sauce. Drain your pasta and broccoli and add them to the skillet as well. If you’re using spinach, toss it in now. Stir everything together until the pasta and chicken are fully coated in that glorious, creamy sauce.
  6. Serve immediately, topped with a little extra parmesan cheese if you’re feeling fancy!

What’s your secret weapon weeknight meal? Let me know in the comments!